

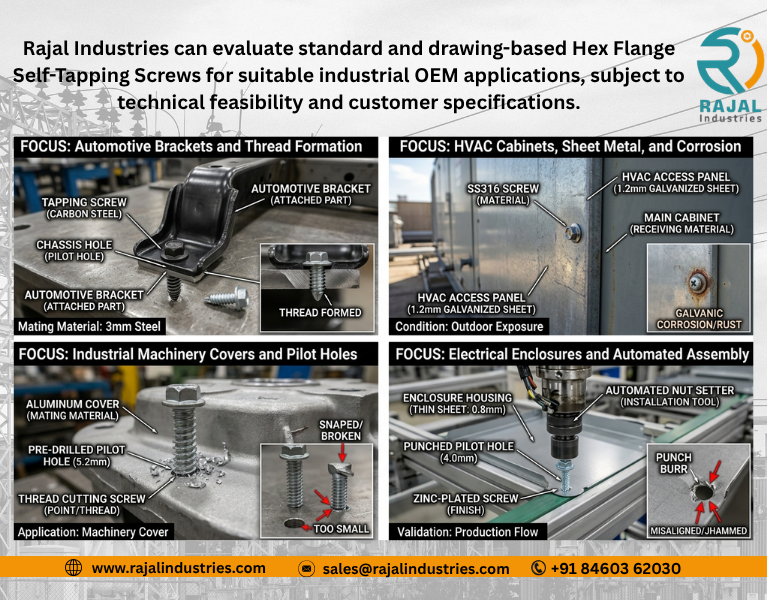
Selecting the correct Hex Flange Self Tapping Screw requires more than choosing a diameter and length from a catalogue.
The screw must work with the actual:
Mating Material + Material Thickness + Pilot Hole + Joint Design + Installation Process
A technically correct selection process should therefore follow:
Application → Mating Material → Thickness → Pilot Hole → Thread → Point → Diameter → Length → Hex Head → Flange → Material → Mechanical Properties → Finish → Installation → Validation
This Self Tapping Guide explains how engineers and OEM buyers can make these decisions systematically and avoid common problems such as high tapping torque, thread stripping, screw breakage, poor flange seating and inconsistent production assembly.
Quick Answer: How Do You Select a Hex Flange Self-Tapping Screw?
To select a Hex Flange Self Tapping Screw, first define the mating material, material thickness and pilot hole. Then select the appropriate screw diameter, self-tapping thread, point, length, hex/flange geometry, material, mechanical properties and finish.
Finally, validate the finished screw using the actual or representative production joint and intended installation method.
For custom OEM Screws, the approved engineering drawing should remain the main technical reference.
Hex Flange Self-Tapping Screw Selection Process
Use this sequence:
| Step | Selection Decision | Main Question |
| 1 | Application | What is being fastened? |
| 2 | Mating Material | What material receives the thread? |
| 3 | Thickness | How much material is available? |
| 4 | Pilot Hole | What hole will the screw enter? |
| 5 | Thread | How will the mating thread be developed? |
| 6 | Point | How will the screw start? |
| 7 | Diameter | What nominal size is appropriate? |
| 8 | Length | How much engagement is needed? |
| 9 | Hex Head | What tool will install it? |
| 10 | Flange | What bearing geometry is required? |
| 11 | Material | What screw material is suitable? |
| 12 | Properties | What mechanical performance is required? |
| 13 | Finish | What corrosion/friction requirement applies? |
| 14 | Installation | How will production install it? |
| 15 | Validation | Does the complete joint perform correctly? |
Step 1: Understand the Application
Do not start with:
“Which self-tapping screw size should I use?”
Start with:
“What exactly am I fastening?”
The application determines the rest of the specification.
Potential industrial applications include:
- Automotive brackets
- Sheet-metal panels
- HVAC cabinets
- Electrical enclosures
- Appliance frames
- Machinery covers
- Industrial housings
- Equipment guards
- Fabricated assemblies
Each can require a different screw.
Application Questions to Ask First
Before selecting the screw, determine:
- What is the function of the joint?
- What materials are being joined?
- Which component will receive the self-tapped thread?
- What is its thickness?
- Is the joint permanent or serviceable?
- Is the equipment indoor or outdoor?
- Is vibration present?
- Is corrosion important?
- Is installation manual or automated?
- Is the application safety or function critical?
These questions reduce the risk of selecting a fastener from appearance alone.
Step 2: Identify the Mating Material
The self-tapping screw interacts directly with the material receiving the thread.
Possible mating materials can include:
- Carbon-steel sheet
- Stainless-steel sheet
- Aluminium
- Plastics
- Other engineered materials
The same screw should not automatically be assumed suitable for all of them.
Why Mating Material Matters
Material characteristics can influence:
- Thread formation
- Tapping torque
- Strip resistance
- Screw point behaviour
- Required pilot hole
- Installation speed
For example, a screw validated in one sheet-metal grade may behave differently in a harder or softer material.
Steel Sheet Applications
For steel sheet, define:
Material Grade + Thickness + Hole Diameter + Hole Process
Do not simply specify:
“Sheet metal.”
Different steel grades can behave differently during self-tapping installation.
Stainless-Steel Sheet Applications
Stainless mating material may create different installation conditions than mild steel.
Important considerations can include:
- Material hardness
- Friction
- Thread-forming resistance
- Screw material
- Installation method
The joint should be tested using the actual stainless grade.
Aluminium Applications
Aluminium can provide different thread-forming and stripping behaviour from steel.
Important considerations include:
- Alloy
- Thickness
- Pilot hole
- Thread geometry
- Installation setting
- Galvanic compatibility where relevant
Avoid transferring a steel-sheet screw specification directly to aluminium without review.
Plastic Applications
Self-tapping fasteners for plastic can require thread geometries specifically intended for polymer materials.
A conventional sheet-metal self-tapping screw should not automatically be selected for plastic.
Consider:
- Plastic type
- Boss geometry
- Wall thickness
- Pilot hole
- Thread design
- Assembly speed
- Repeated removal
Where the application is plastic, use a fastener design validated for that polymer and component geometry.
Step 3: Determine Material Thickness
Thickness determines how much mating material is available for thread engagement.
This is especially important in sheet metal.
Thin Sheet
Thin sheet can create risks such as:
- Limited thread engagement
- Hole stripping
- Material distortion
- Low retention
The solution is not automatically a larger screw.
The entire joint needs review.
Thicker Material
Thicker material can provide more potential engagement, but it can also increase resistance during thread formation or cutting.
Possible effects include:
- Higher tapping torque
- Longer tapping stage
- Increased screw-property requirements
The selected thread and point should suit the material.
Do Not Select from Sheet Thickness Alone
A common mistake is:
“This sheet is 1.5 mm, so which screw should I use?”
Thickness alone is not enough.
You also need:
Material + Hole + Thread + Required Performance
Step 4: Define the Pilot Hole
The pilot hole is one of the most important variables in this Self Tapping Guide.
Think of the fastening system as:
Screw + Hole + Mating Material
rather than:
Screw Only
What Determines Pilot-Hole Size?
Pilot-hole requirements can depend on:
- Screw diameter
- Thread geometry
- Point
- Mating material
- Material hardness
- Material thickness
- Hole manufacturing process
- Required joint performance
There is no universal pilot-hole size based only on nominal screw diameter.
What Happens If the Pilot Hole Is Too Small?
Possible results include:
- High tapping torque
- Difficult starting
- Screw deformation
- Screw breakage
- Point damage
- Material distortion
If production operators need unusually high force, investigate the hole before changing the screw.
What Happens If the Pilot Hole Is Too Large?
Possible results include:
- Reduced thread engagement
- Low strip resistance
- Poor retention
- Loose assembly
A screw that installs very easily is not necessarily performing correctly.
Pilot-Hole Tolerance Matters
For OEM production, do not evaluate only the nominal hole.
For example, if a hole is controlled as:
Nominal Diameter ± Drawing Tolerance
the fastening system should remain acceptable across the approved manufacturing variation where required by the validation plan.
Hole Manufacturing Method
The pilot hole can be:
- Punched
- Drilled
- Laser cut
- Produced using another approved process
Each process can create different:
- Burrs
- Taper
- Roundness
- Edge conditions
- Dimensional variation
Testing should ideally use production-representative holes.
Punched Hole Direction
Punched holes can have different characteristics on the punch-entry and breakout sides.
If the screw is always installed from one direction, reproduce that orientation during functional testing where relevant.
Step 5: Choose the Self-Tapping Thread
“Self-tapping” does not identify one universal thread.
Different screw designs can create the mating thread differently.
Two broad categories are:
Thread Forming and Thread Cutting
Thread-Forming Screws
A thread-forming screw primarily develops the mating thread by displacing material.
Selection depends on:
- Mating material
- Material hardness
- Thickness
- Pilot hole
- Screw geometry
Potential benefits can include avoiding cutting chips from the thread-forming action.
However, installation torque should be evaluated.
Thread-Cutting Screws
Thread-cutting designs use cutting features to remove some material while developing the mating thread.
Important considerations include:
- Mating material
- Hole
- Cutting geometry
- Chip generation
- Installation process
Where loose chips are unacceptable, this should be considered during engineering review.
Thread Forming vs Thread Cutting
| Factor | Thread Forming | Thread Cutting |
| Main Action | Material displacement | Material removal |
| Chips | Generally avoids cutting chips | Can produce chips |
| Hole Selection | Critical | Critical |
| Material Suitability | Must be evaluated | Must be evaluated |
| Installation Torque | Application dependent | Application dependent |
| Final Choice | Functional validation | Functional validation |
Neither type is universally better.
Step 6: Select the Point
Point geometry influences:
- Hole entry
- Alignment
- Starting
- Thread engagement
A suitable point helps the screw enter the prepared hole correctly.
Point Problems
An unsuitable or inconsistent point can contribute to:
- Poor starting
- Misalignment
- Increased tapping torque
- Hole damage
- Automated assembly problems
For custom OEM Screws, point geometry should be controlled by the drawing or applicable specification.
Step 7: Select Screw Diameter
Diameter selection should consider:
Material + Thickness + Hole + Required Joint Performance + Available Space
Do not simply choose the largest diameter that fits.
A larger diameter can also mean:
- Larger hole
- Larger head
- Larger flange
- Greater material displacement
- Different tapping behaviour
Step 8: Select Screw Length
Length should provide adequate engagement without unwanted protrusion.
Consider:
Component Stack + Required Engagement + Point + Internal Clearance
Too-Short Screw
Possible problems:
- Insufficient engagement
- Incomplete thread development
- Poor retention
Too-Long Screw
Possible problems:
- Wiring interference
- Contact with internal components
- Contact with moving parts
- Product damage
- Unnecessary installation time
This is particularly important in electrical equipment, appliances and enclosed machinery.
Step 9: Select the Hex Head
The external hex head should work with the intended:
- Socket
- Nut setter
- Manual wrench
- Powered tool
Important dimensions include:
- Across flats
- Head height
- Across corners where relevant
- Tool clearance
Why Across-Flats Control Matters
Incorrect across flats can create:
- Loose socket fit
- Tool slipping
- Head damage
- Production variation
For automated installation, consistent head geometry becomes particularly important.
Step 10: Select the Flange
The integrated flange provides a wider under-head bearing surface.
Potential advantages in suitable joints include:
- Wider contact area
- Controlled seating
- Reduced separate washer handling where approved
But flange dimensions must suit the actual component.
Flange Diameter Selection
Check:
- Available bearing area
- Nearby walls
- Formed features
- Adjacent components
- Tool access
A larger flange is not automatically better.
Flange Thickness & Geometry
For custom Hex Washer Screws, specify:
- Flange diameter
- Flange thickness
- Under-head geometry
- Head height
- Across flats
Do not rely only on the term “hex washer head.”
Can the Flange Replace a Washer?
Sometimes.
But not always.
A separate washer may still be required for:
- Specific load distribution
- Surface protection
- Electrical functions
- Joint design
- Customer specification
Follow the approved assembly design.
Step 11: Select Screw Material
Material selection should consider:
Self-Tapping Performance + Mechanical Requirement + Environment + Mating Material + Cost
Possible material categories include:
- Carbon steel
- Alloy steel where specified
- Stainless steel
- Customer-specified materials
Carbon Steel
Carbon steel can be suitable for many:
- Automotive
- Sheet-metal
- HVAC
- Appliance
- Electrical
- Machinery
applications when the specified mechanical properties and surface protection are achieved.
Stainless Steel
Stainless steel can be useful where corrosion resistance is important.
Possible requirements include:
- SS304 / A2-type
- SS316 / A4-type
- Other customer-specified grades
However:
Stainless Steel ≠ Automatic Replacement for Hardened Carbon Steel
The tapping function must also be considered.
SS304 vs SS316
| Factor | SS304 / A2-Type | SS316 / A4-Type |
| General Corrosion Resistance | Good | Generally improved in certain environments |
| Chloride Resistance | More limited | Generally better |
| Cost | Usually lower | Usually higher |
| Indoor Industrial Use | Common | Application dependent |
| Coastal Exposure | Requires careful evaluation | Often considered |
| Final Decision | Specification/environment | Specification/environment |
Do not choose only by grade reputation.
Galvanic Compatibility
Where different metals contact each other in the presence of an electrolyte, galvanic corrosion can become a design consideration.
For example:
Stainless Fastener + Aluminium Component + Moisture
may require evaluation of:
- Material combination
- Environment
- Coatings
- Isolation strategy
- Customer requirements
Fastener corrosion and component corrosion should be considered together.
Step 12: Define Mechanical Properties
For a self-tapping screw, required properties may include:
- Hardness
- Strength
- Toughness
- Torsional performance
- Surface/core properties
- Functional tapping performance
The exact requirements depend on the screw design and applicable specification.
Hardness: Avoid “Higher Is Better”
A screw that is too soft can experience:
- Thread deformation
- Point damage
- Poor tapping
A screw that is excessively brittle can experience:
- Fracture
- Head failure
- Thread cracking
The objective is:
Specified Mechanical Properties
not maximum hardness.
Step 13: Select the Surface Finish
Finish should be selected from:
Environment + Corrosion Requirement + Friction + Appearance + OEM Specification
Possible options can include:
- Zinc-based systems
- Black finishes
- Engineered corrosion-resistant coatings
- Passivation for suitable stainless products
- Customer-specified finishes
Do Not Select Coating by Colour
Two screws can look similar but have different:
- Coating chemistry
- Thickness
- Corrosion performance
- Friction behaviour
Instead of:
“Silver zinc required”
use the actual approved coating specification where available.
Coating Can Change Installation
Coating affects more than corrosion.
It can influence:
- Thread dimensions
- Friction
- Tapping torque
- Seating
- Tool engagement
This is why final validation should preferably use the production-intended coating.
Step 14: Determine the Installation Method
Ask:
How will the factory actually install this screw?
Possible methods include:
- Manual
- Powered
- Semi-automatic
- Fully automated
The screw should be validated accordingly.
Manual Installation
Check:
- Tool access
- Socket fit
- Alignment
- Operator variation
Manual installation does not eliminate the need for process control.
Powered Installation
Check:
- Tool type
- Socket/nut setter
- Speed
- Installation setting
- Alignment
- Tool wear
Do not increase the tool setting simply because the screw is difficult to install.
Investigate the cause.
Automated Installation
For automated assembly, the screw must work through:
Feeding → Orientation → Delivery → Tool Engagement → Hole Entry → Tapping → Seating
Important fastener characteristics can include:
- Head consistency
- Flange diameter
- Length
- Straightness
- Point consistency
- Thread quality
- Burr control
- Surface condition
Step 15: Validate the Complete Joint
A dimensional inspection tells you whether the screw matches specified dimensions.
It does not necessarily tell you whether the screw works correctly in the actual assembly.
Functional validation closes that gap.
Production-Representative Validation
Where practical, test:
Production Screw + Final Finish + Production Material + Production Hole + Production Tool
Evaluate:
- Starting
- Tapping behaviour
- Seating
- Thread integrity
- Retention
- Strip/failure behaviour where specified
- Removal/reinstallation where required
Understanding the Installation Stages
Self-tapping installation can be considered in stages:
Stage 1: Entry
The point enters and aligns with the hole.
Stage 2: Tapping
The screw develops the mating thread.
Stage 3: Seating
The flange reaches the component.
Stage 4: Tightening
The joint reaches its specified installed condition.
Problems at each stage can have different causes.
Tapping Torque
Tapping torque can be influenced by:
- Hole diameter
- Mating material
- Material hardness
- Thickness
- Thread
- Point
- Screw properties
- Finish
- Installation speed
There is no universal tapping torque based only on screw diameter.
Seating & Tightening
Once the flange reaches the mating surface, the installation condition changes.
The production tool must tighten the joint without:
- Stripping the mating thread
- Breaking the screw
- Damaging the flange
- Deforming the component
Why Generic Torque Charts Can Be Risky
A generic chart may not account for:
- Your pilot hole
- Your material
- Your thickness
- Your thread
- Your coating
- Your installation speed
- Your joint geometry
Use approved application data and validation for production settings.
Serviceability: Will the Screw Be Removed?
This question is often forgotten.
If the screw will be removed for:
- Maintenance
- Inspection
- Cleaning
- Component replacement
validate the formed mating thread after repeated service cycles.
When Another Fastening System May Be Better
A Hex Flange Self Tapping Screw is not the best solution for every industrial assembly.
Consider another fastening system where the joint specifically requires:
- Frequent repeated servicing
- A reusable machine thread
- Nut-and-bolt fastening
- Threaded insert
- Structural bolted connection
- Specialized locking system
- Safety-critical approved fastening arrangement
Fastener selection should follow engineering requirements rather than convenience.
Industrial Application Selection Matrix
| Application | Main Selection Priority |
| Automotive Bracket | Hole + thread + coating |
| Automotive Housing | Length + clearance |
| Sheet-Metal Panel | Thickness + stripping |
| HVAC Cabinet | Sheet + corrosion |
| HVAC Access Panel | Serviceability |
| Machinery Cover | Vibration + service |
| Electrical Enclosure | Clearance + finish |
| Appliance | High-volume consistency |
| Industrial Cabinet | Environment + assembly |
| Automated OEM Line | Geometry + feeding |
Selecting OEM Screws
For custom OEM Screws, a controlled drawing should define the fastener rather than relying only on a catalogue description.
Important drawing information can include:
Diameter + Length + Thread + Point + Head + Flange + Material + Mechanical Properties + Finish + Tolerances
Supporting application information should include:
Mating Material + Thickness + Pilot Hole + Installation + Testing
Standard vs Custom Screw
Choose a Standard Screw When
- Standard dimensions fit the joint
- Available thread suits the application
- Head/flange fits
- Material meets requirements
- Finish meets requirements
Consider Custom Development When
- Special head height is required
- Flange diameter is modified
- Special point is needed
- Customer thread is specified
- Unusual length is required
- Customer marking is needed
- Special finish is required
Avoid unnecessary customization.
Why Unnecessary Customization Costs More
A custom screw can require:
- Dedicated tooling
- Development
- Samples
- Additional inspection
- Higher MOQ
- Longer initial lead time
Use custom geometry only where it provides a real engineering or commercial benefit.
Common Selection Mistakes
1. Choosing by Diameter and Length Only
This ignores the thread, point, hole and material.
2. Using One Pilot Hole for Every Material
Different materials can behave differently.
3. Assuming Bigger Screw Means Stronger Joint
The mating material can still fail.
4. Ignoring Sheet Thickness
Thickness affects engagement.
5. Confusing Self-Tapping with Self-Drilling
They perform different functions.
6. Selecting Maximum Hardness
Excessive brittleness can create failures.
7. Selecting Coating by Colour
Appearance does not define performance.
8. Assuming the Flange Always Replaces a Washer
Joint requirements vary.
9. Ignoring Serviceability
Repeated removal can affect the formed thread.
10. Approving Only by Dimensional Inspection
Functional installation also matters.
Selection Troubleshooting Table
| Symptom | First Check | Then Check |
| Screw Won’t Start | Pilot hole | Point/alignment |
| High Tapping Torque | Hole size | Material/thread |
| Very Low Tapping Torque | Hole size | Engagement |
| Screw Breaks | Hole + tool | Mechanical properties |
| Hole Strips | Thickness + hole | Thread/setting |
| Flange Damages Sheet | Installation | Flange/joint |
| Tool Slips | Socket | Across flats |
| Screw Corrodes | Environment | Material/coating |
| Screw Loosens | Joint design | Installation/vibration |
| Feeder Jams | Screw geometry | Feeding equipment |
How to Investigate a Screw Failure
Do not start by asking:
“What is wrong with the screw?”
Start with four areas:
1. Fastener
Thread, point, dimensions, material, heat treatment, coating.
2. Mating Component
Material, thickness, hole, burrs, geometry.
3. Installation Process
Tool, socket, speed, alignment, setting.
4. Service Environment
Vibration, corrosion, temperature, maintenance.
This creates a much stronger root-cause investigation.
Sample Approval Before Bulk Production
For custom Hex Washer Screws or OEM self-tapping screws, use a controlled approval process:
Drawing Review → Application Review → Feasibility → Tooling → Samples → Inspection → Final Finish → Functional Installation → Customer Approval
For high-volume programs:
Approved Sample → Pilot Lot → Production Trial → Mass Production
Sample Approval Checklist
Before approving samples, confirm:
☐ Drawing revision
☐ Screw diameter
☐ Length
☐ Thread
☐ Point
☐ Across flats
☐ Head height
☐ Flange diameter
☐ Flange thickness
☐ Material
☐ Mechanical properties
☐ Heat treatment
☐ Finish
☐ Mating material
☐ Material thickness
☐ Pilot hole
☐ Installation tool
☐ Tapping behaviour
☐ Seating
☐ Functional performance
High-Volume OEM Production
A supplier must do more than make one correct sample.
The real requirement is:
Can the supplier repeatedly manufacture the approved screw across production lots?
High-volume OEM supply requires consistent control of:
- Material
- Head
- Flange
- Thread
- Point
- Heat treatment
- Finish
- Inspection
- Packaging
- Traceability
Supplier Selection: Do Not Compare Price First
When comparing suppliers, use this sequence:
Technical Compliance → Quality Capability → Functional Validation → Capacity → Delivery → Commercial Terms
If two quotations represent different technical specifications, the lower price comparison may be meaningless.
Supplier Evaluation Checklist
Evaluate:
- Similar fastener experience
- Drawing-review capability
- Application understanding
- Cold-heading capability
- Head/flange forming
- Thread capability
- Point capability
- Material control
- Heat-treatment control
- Coating control
- Dimensional inspection
- Functional testing
- Traceability
- Sample development
- Custom tooling
- Pilot production
- Production capacity
- Packaging
- Corrective-action support
- Delivery capability
What Should You Send to a Supplier?
A strong RFQ should contain:
Drawing + Application + Mating Material + Thickness + Pilot Hole + Screw Specification + Finish + Testing + Quantity
This allows the supplier to review both manufacturing feasibility and application requirements.
Complete OEM RFQ Checklist
☐ Product name
☐ Part number
☐ Drawing
☐ Drawing revision
☐ Applicable standard
☐ Application
☐ Screw diameter
☐ Length
☐ Thread form
☐ Point
☐ Across flats
☐ Head height
☐ Flange diameter
☐ Flange thickness
☐ Material
☐ Mechanical properties
☐ Heat treatment
☐ Finish/coating
☐ Mating material
☐ Material grade
☐ Material thickness
☐ Pilot-hole diameter
☐ Hole tolerance
☐ Hole manufacturing process
☐ Installation method
☐ Installation tool
☐ Functional testing
☐ Inspection requirements
☐ Documentation requirements
☐ Sample quantity
☐ Pilot quantity
☐ First order quantity
☐ Monthly demand
☐ Annual demand
☐ Packaging
☐ Delivery location
Example OEM RFQ
We require hex flange self-tapping screws for an industrial sheet-metal assembly. Please review the attached drawing together with the mating material, thickness and pilot-hole details. Confirm manufacturing feasibility for the specified thread, point, head/flange geometry, material, mechanical properties and finish. Please also confirm sample development, functional testing, MOQ, tooling, monthly capacity and bulk lead time.
How Rajal Industries Can Support OEM Requirements
Rajal Industries can evaluate standard and drawing-based Hex Flange Self Tapping Screw requirements for suitable industrial OEM applications.
Depending on technical feasibility and customer specifications, requirements can be reviewed for:
- Hex Flange Self-Tapping Screws
- Hex Washer Screws
- OEM Screws
- Industrial Screws
- Automotive Screws
- Sheet-Metal Screws
- Standard Sizes
- Custom Dimensions
- Customer-Specified Threads
- Customer-Specified Points
- Custom Head/Flange Geometry
- Carbon Steel
- Suitable Alloy Steel Requirements
- Suitable Stainless Steel Requirements
- Customer-Specified Finishes
- Dimensional Inspection
- Material Verification
- Specified Mechanical Testing
- Functional Installation Testing
- Batch Traceability
- Custom Tooling
- Sample Development
- Pilot Production
- Bulk OEM Supply
Final feasibility should be confirmed against the approved drawing, mating material, thickness, pilot hole, mechanical requirements, finish, testing requirements and production quantity.
Bulk Buyer Quick Answer
What should I check before ordering a Hex Flange Self Tapping Screw?
Check:
Application + Mating Material + Thickness + Pilot Hole + Thread + Point + Diameter + Length + Head/Flange + Material + Mechanical Properties + Finish + Installation + Testing
For custom OEM Screws, send the supplier the approved drawing and expected annual quantity.
This provides a much stronger basis for quotation than simply requesting a screw by diameter and length.
Quick Selection Decision Tree
Question 1: What material receives the thread?
Steel → Review grade, hardness and thickness.
Stainless Steel → Review tapping resistance and friction.
Aluminium → Review stripping and material compatibility.
Plastic → Evaluate a thread specifically suited to the polymer/application.
↓
Question 2: How thick is the mating material?
Thin Sheet → Focus on engagement and stripping.
Thicker Material → Focus on tapping resistance and screw properties.
↓
Question 3: Is there a prepared hole?
Yes → Define diameter, tolerance and hole process.
No → Do not automatically assume a conventional self-tapping screw can drill the hole. Review whether a self-drilling design is required.
↓
Question 4: What type of thread is required?
Evaluate the specified:
- Thread-forming design
- Thread-cutting design
- Other customer-approved self-tapping geometry
↓
Question 5: How will the screw be installed?
Manual / Powered / Semi-Automatic / Automated
↓
Question 6: What environment will the assembly face?
Indoor / Humid / Outdoor / Coastal / Industrial
↓
Question 7: Has the final joint been tested?
If not, validate the production-intended screw, coating, hole, mating material and installation process before bulk approval.
Application-Specific Selection Matrix
| Application | Primary Concern | Secondary Concern | Validation Priority |
| Automotive Bracket | Hole/thread | Coating | Production installation |
| Automotive Housing | Clearance | Finish | Screw length |
| Sheet-Metal Panel | Engagement | Distortion | Strip behaviour |
| HVAC Cabinet | Corrosion | Sheet thickness | Installation |
| HVAC Access Panel | Reuse | Corrosion | Removal cycles |
| Electrical Enclosure | Internal clearance | Finish | Complete assembly |
| Machinery Cover | Vibration/service | Thread | Functional test |
| Appliance Panel | Production speed | Appearance | Line trial |
| Industrial Cabinet | Environment | Serviceability | Joint test |
| Automated Assembly | Feedability | Torque consistency | Production trial |
Selecting Screws for Automotive Assemblies
For automotive applications, a Hex Flange Self Tapping Screw may be considered for suitable:
- Sheet-metal brackets
- Covers
- Panels
- Housings
- Interior components
- Equipment mounting components
Selection should follow the OEM or Tier supplier’s approved requirements.
Pay particular attention to:
Consistency + Traceability + Coating + Installation + Functional Performance
Automotive Brackets
For an automotive bracket, start with:
Bracket Material → Thickness → Hole → Required Joint Performance
Then select:
Thread → Point → Diameter → Length → Flange → Material → Finish
The production installation process should be part of approval.
Automotive Electrical Housings
For electrical or electronic housings, screw length can become particularly important.
Check clearance from:
- Wiring
- Connectors
- Electronic components
- Internal brackets
- Other assemblies
Do not choose additional screw length simply to obtain more engagement without checking internal clearance.
Selecting Sheet Metal Screws
For Sheet Metal Screws, three variables deserve particular attention:
Material Thickness + Pilot Hole + Thread Geometry
These variables directly interact.
Changing one can change installation behaviour.
Thin Sheet Selection
Thin sheet provides limited material for developing the mating thread.
Important risks include:
- Stripping
- Distortion
- Low engagement
- Over-tightening
Possible engineering responses can include reviewing:
- Thread geometry
- Hole diameter
- Screw diameter
- Joint design
- Installation control
Do not automatically solve a thin-sheet problem by increasing screw hardness.
Thick Sheet Selection
As mating material becomes thicker, the screw may encounter greater tapping resistance.
Check:
- Pilot hole
- Thread geometry
- Point
- Mating material hardness
- Screw properties
- Installation capability
The exact relationship should be confirmed by application testing.
Thin vs Thick Sheet Decision Matrix
| Factor | Thin Sheet | Thicker Material |
| Main Risk | Stripping | High tapping resistance |
| Engagement | Limited | Potentially greater |
| Hole Control | Critical | Critical |
| Thread Selection | Critical | Critical |
| Installation Setting | Avoid over-tightening | Avoid excessive tapping load |
| Functional Test | Strip/retention | Tapping + screw integrity |
Pilot-Hole Validation
Pilot-hole selection should not end with:
“The screw fits.”
A suitable hole should support acceptable:
- Starting
- Tapping
- Thread formation
- Seating
- Retention
- Failure margin where specified
Test the Production Hole
For a high-volume stamped component, test screws using a representative stamped hole.
For a fabricated laser-cut component, use a representative laser-cut hole.
For a drilled component, test the actual drilling condition.
This helps account for differences in:
- Burr
- Taper
- Edge condition
- Dimensional variation
Nominal Hole vs Production Variation
Suppose a pilot hole has an approved tolerance.
Testing only the exact nominal dimension may not represent production.
Where required by the validation plan, evaluate expected hole variation to determine whether installation remains acceptable throughout the approved range.
Never Fix High Torque by Enlarging the Hole Blindly
If tapping torque is too high, increasing pilot-hole diameter may reduce resistance.
But an oversized hole can also reduce:
- Thread engagement
- Retention
- Stripping resistance
The correct hole should balance installation and joint performance.
Thread Selection Decision
Consider Thread Forming When
The specified screw design and mating material are suitable for controlled material displacement.
Consider Thread Cutting When
The approved application requires a cutting action and any resulting material removal is acceptable.
Neither should be selected solely because one produces lower installation torque in an uncontrolled test.
Point Selection
The point must work with:
- Pilot hole
- Material
- Thickness
- Thread
- Installation direction
In automatic assembly, consistent point geometry can also improve entry into the hole.
Selecting Screw Length
Use:
Component Stack + Required Engagement + Point/Clearance Requirement
Then physically verify the assembly.
Length Selection Example
Imagine a screw passes through:
- Cover sheet
- Spacer/bracket
- Mating sheet
Do not simply add the three thicknesses and select the next longer screw.
Determine:
- Which component is a clearance layer
- Which component receives the thread
- Required engagement
- Point protrusion
- Internal clearance
The actual joint geometry controls the decision.
Selecting Hex Washer Screws
The term Hex Washer Screws can describe different commercial head geometries.
For OEM purchasing, specify:
Across Flats + Head Height + Flange/Washer Diameter + Flange Thickness + Under-Head Geometry
This avoids interpretation differences between suppliers.
Selecting Flange Diameter
A wider flange can provide a larger bearing area, but it can also interfere with:
- Nearby formed features
- Walls
- Other fasteners
- Components
- Installation tooling
Select the flange from the joint geometry rather than choosing the largest available diameter.
Flange Seating
A properly selected flange should seat as intended against the component.
If it does not, investigate:
- Flange geometry
- Component burr
- Hole distortion
- Surface shape
- Installation alignment
- Tightening condition
Do not assume every seating problem is a screw manufacturing defect.
Material Decision Matrix
| Requirement | Material Direction to Evaluate |
| General Industrial Assembly | Suitable carbon steel may be considered |
| Defined Mechanical Properties | Appropriate steel/property system |
| Corrosion Requirement | Material + coating combination |
| Stainless Requirement | Specified stainless grade |
| Chloride Exposure | Environment-specific material review |
| Aluminium Assembly | Mechanical + galvanic review |
| Customer-Specified Material | Follow approved specification |
Final material selection should follow the drawing and application requirements.
Carbon Steel + Coating vs Stainless Steel
A common procurement question is:
Should we use coated carbon steel or stainless steel?
There is no universal answer.
Compare:
- Required mechanical properties
- Tapping performance
- Corrosion requirement
- Mating material
- Environment
- Cost
- Customer specification
A more expensive material is not automatically the better engineering choice.
Coating Selection Matrix
| Environment | What to Evaluate |
| Indoor Dry | Basic corrosion requirement + friction |
| Humid | Moisture resistance |
| Outdoor | Defined corrosion specification |
| Coastal | Chloride exposure |
| Automotive | OEM coating/friction requirement |
| HVAC | Indoor/outdoor environment |
| Industrial | Chemicals, pollutants and moisture |
Avoid specifying a coating only as “silver,” “black” or “rust-proof.”
Coating and Friction
The surface finish can influence:
- Tapping torque
- Seating behaviour
- Tightening response
- Thread dimensions
Therefore:
Same Screw Geometry + Different Coating ≠ Automatically Same Installation Behaviour
This is important when changing coating suppliers or coating systems.
Validate the Final Production Finish
Where practical, approve samples with the intended production finish.
Testing an uncoated screw and later approving a coated production screw without functional review can miss friction-related changes.
Understanding the Installation Window
For a self-tapping joint, engineers should distinguish between:
Starting
The screw enters and aligns.
Tapping
The mating thread is developed.
Seating
The flange contacts the component.
Tightening
The joint reaches the intended installed condition.
Failure
Further tightening may lead to stripping, screw failure or component damage.
Why Installation Margin Matters
A stable assembly should not require extremely precise operator control just to avoid failure.
Where the application requires it, validation should establish an acceptable process window between normal installation and the relevant failure condition.
The required margin must come from the customer’s engineering validation rather than a universal internet value.
High Tapping Torque
If tapping torque is high, check:
- Pilot hole
- Mating material
- Material hardness
- Thickness
- Thread geometry
- Point
- Screw properties
- Finish
- Alignment
- Installation speed
Do not immediately increase driver torque.
Low Tapping Resistance
Very low resistance can indicate:
- Oversized hole
- Insufficient material engagement
- Incorrect thread
- Incorrect mating material
Easy installation alone is not proof of a good joint.
Screw Breakage During Installation
Possible causes include:
Small Hole + Hard Material + Misalignment + Excessive Installation + Incorrect Screw Properties
A proper investigation should examine both the screw and application.
Thread Stripping
If the mating thread strips, investigate:
- Hole diameter
- Sheet thickness
- Thread geometry
- Material
- Installation setting
- Screw size
Increasing screw strength alone may not solve a weak mating thread.
Flange or Sheet Deformation
Possible causes include:
- Excessive tightening
- Thin/soft component
- Flange geometry
- Burrs
- Poor seating surface
The failure location should be identified before changing the fastener.
Automatic Assembly Selection
For automatic production lines, the screw must perform consistently before it even reaches the joint.
The sequence can be:
Bulk Feeding → Orientation → Transfer → Tool Pickup → Hole Entry → Tapping → Seating
Fastener Characteristics for Automated Assembly
Important characteristics can include:
- Overall length consistency
- Straightness
- Head geometry
- Flange diameter
- Point consistency
- Thread quality
- Burr control
- Surface condition
The automatic equipment supplier and fastener supplier may both need to participate in validation.
Automatic Assembly Troubleshooting
| Problem | Possible Fastener Factor | Possible Process Factor |
| Feeder Jam | Geometry/straightness | Feeder setup |
| Poor Pickup | Head variation | Tool setup |
| Missed Hole | Point/straightness | Alignment |
| High Torque | Thread/finish | Hole/tool |
| Head Damage | Across flats | Socket wear |
| Incomplete Seating | Flange/thread | Driver setting |
This prevents every production-line problem from being classified automatically as a fastener defect.
Serviceability Decision
Ask before approving the fastener:
How many times will this joint need to be opened?
For an assembly expected to remain closed, self-tapping fastening may be suitable where engineering permits.
For frequent maintenance access, evaluate whether the formed mating thread remains acceptable after repeated cycles.
When to Consider an Alternative Fastening Method
An alternative may be more appropriate where the joint requires:
- Frequent removal
- Reusable machine thread
- High structural loading
- Specialized locking
- Safety-critical approved fastening
- Specific clamp-load control
- Nut-and-bolt connection
The objective is to choose the right fastening system, not to use self-tapping screws everywhere.
Failure Analysis: Use the Four-Part Method
When a problem occurs, investigate:
1. Fastener
- Dimensions
- Thread
- Point
- Material
- Mechanical properties
- Heat treatment
- Finish
2. Mating Component
- Material
- Hardness
- Thickness
- Hole
- Burr
- Geometry
3. Installation
- Tool
- Socket
- Speed
- Alignment
- Setting
4. Service Environment
- Vibration
- Corrosion
- Temperature
- Maintenance
This provides a more reliable root-cause process.
Practical Troubleshooting Table
| Problem | First Investigation |
| Screw does not start | Hole + point |
| High tapping torque | Hole + mating material |
| Screw breaks | Hole + tool + screw properties |
| Thread strips | Hole + thickness |
| Screw feels loose | Engagement + hole |
| Flange does not seat | Surface + flange |
| Hex head damages | Tool + across flats |
| Early corrosion | Environment + coating |
| Screw loosens | Complete joint |
| Feeder jams | Fastener geometry + feeder |
Supplier Comparison for OEM Screws
Do not compare suppliers only on:
₹/Piece or $/1,000 Pieces
Compare the complete offer.
| Factor | Supplier A | Supplier B | Supplier C |
| Drawing Compliance | Check | Check | Check |
| Material | Check | Check | Check |
| Thread/Point Capability | Check | Check | Check |
| Custom Flange | Check | Check | Check |
| Heat Treatment | Check | Check | Check |
| Coating | Check | Check | Check |
| Functional Testing | Check | Check | Check |
| Traceability | Check | Check | Check |
| Sample Support | Check | Check | Check |
| MOQ | Compare | Compare | Compare |
| Capacity | Compare | Compare | Compare |
| Lead Time | Compare | Compare | Compare |
| Price | Compare Last | Compare Last | Compare Last |
Technical equivalence should come before price comparison.
Manufacturer vs Trader
For custom OEM Screws, understand who controls:
- Heading
- Threading
- Heat treatment
- Coating
- Inspection
- Packaging
Some processes may legitimately be subcontracted.
The important question is not simply:
“Is everything in-house?”
A better question is:
“How are all manufacturing and outsourced processes controlled, inspected and traced?”
Supplier Qualification Questions
Ask potential suppliers:
- Have you manufactured similar screws?
- Can you review our application as well as the drawing?
- Which manufacturing processes are in-house?
- Which processes are subcontracted?
- How is raw material controlled?
- How is head/flange geometry inspected?
- How is the thread inspected?
- How is point geometry controlled?
- How is heat treatment controlled?
- How is coating controlled?
- Can you support functional installation testing?
- Can you manufacture samples before bulk production?
- Can you support a pilot lot?
- What traceability is available?
- What inspection documents can be supplied?
- What is the tooling requirement?
- What is the MOQ?
- What is the sample lead time?
- What is the bulk lead time?
- What is the monthly production capacity?
Sample Approval Process
For drawing-based Hex Washer Screws and custom self-tapping screws:
Drawing → Technical Review → Tooling → Samples → Dimensional Inspection → Material/Mechanical Verification → Final Finish → Functional Trial → Customer Approval
For high-volume production:
Approved Samples → Pilot Lot → Production Trial → Mass Production
Why a Golden Sample Is Not Enough
A physical approved sample is useful, but it should not replace the controlled drawing and specification.
A sample may not communicate:
- Tolerances
- Material specification
- Mechanical properties
- Coating requirements
- Inspection criteria
- Revision history
Use:
Approved Drawing + Specification + Approved Sample
where appropriate.
Pilot-Lot Validation
A pilot lot can help confirm that the manufacturing process reproduces the approved screw at a larger scale.
Review:
- Head consistency
- Flange dimensions
- Thread
- Point
- Material
- Heat treatment
- Finish
- Functional behaviour
- Packaging
This is particularly useful before high-volume OEM production.
Production Quality Flow
A practical quality-control sequence can be:
Raw Material → Heading/Forming → Thread/Point → Heat Treatment → Surface Finish → Dimensional Inspection → Functional Testing → Final Inspection → Packaging → Lot Identification
The exact process varies with the screw design and customer specification.
Common Buyer Mistakes
Mistake 1: Sending Only a Photo
A photo cannot fully define the fastener.
Mistake 2: Sending Only Diameter and Length
Thread, point, flange and material remain unclear.
Mistake 3: Not Providing the Application
The supplier cannot properly understand the mating condition.
Mistake 4: Hiding Pilot-Hole Information
For self-tapping screws, the hole is important technical data.
Mistake 5: Selecting the Lowest Quote Before Technical Comparison
Different suppliers may be quoting different specifications.
Mistake 6: Approving Unfinished Samples
The final coating can change installation behaviour.
Mistake 7: Skipping Pilot Production
A few samples do not always represent high-volume production.
Mistake 8: Changing the Hole After Screw Approval
The fastening system may need revalidation.
Mistake 9: Changing Coating Without Review
Friction and corrosion behaviour can change.
Mistake 10: Treating Every Installation Issue as a Screw Defect
The mating component and assembly process must also be investigated.
OEM RFQ Format
A strong RFQ can follow this structure:
Fastener
Hex Flange Self Tapping Screw
Drawing
Attach controlled drawing and revision.
Application
Describe what is being assembled.
Mating Material
Specify grade and thickness.
Hole
Specify diameter, tolerance and manufacturing process.
Screw Requirements
Specify:
- Diameter
- Length
- Thread
- Point
- Hex head
- Flange
Material & Properties
Specify required material and mechanical requirements.
Finish
Provide approved coating specification.
Testing
Define dimensional, mechanical, coating and functional requirements.
Commercial
Provide:
- Sample quantity
- First order quantity
- Annual quantity
- Packaging
- Delivery destination
Example Strong RFQ
We require a custom Hex Flange Self Tapping Screw for an industrial sheet-metal assembly. Please review the attached drawing and application details. The mating material, thickness, pilot-hole diameter and installation process are provided. Please confirm manufacturing feasibility, tooling, sample development, functional testing, MOQ, monthly capacity, bulk lead time and quotation.
Frequently Asked Questions
How do I choose a Hex Flange Self Tapping Screw?
Start with the mating material, thickness and pilot hole. Then select the thread, point, diameter, length, head/flange geometry, material and finish. Validate the finished screw using the intended production joint and installation process.
How do I choose the correct self-tapping screw size?
Do not select size from sheet thickness alone. Consider the material, hole, thread geometry, required engagement, joint performance and available space.
What pilot hole should I use for a self-tapping screw?
The correct pilot hole depends on the screw diameter, thread, point, mating material, hardness and thickness. Use the applicable technical specification and application validation rather than a universal hole chart.
What happens if a self-tapping pilot hole is too small?
Installation resistance can become excessive, potentially contributing to high tapping torque, material distortion, point damage or screw failure.
What happens if the pilot hole is too large?
Thread engagement and retention can decrease, increasing the risk of mating-thread stripping or a loose joint.
Are Hex Washer Screws the same as hex flange screws?
Terminology can overlap, but geometry varies between products and suppliers. For OEM sourcing, define across flats, head height, flange diameter, flange thickness and under-head geometry.
Can a hex flange replace a washer?
In some joints it can reduce the need for a separate washer, but not universally. Follow the approved joint design.
Should I use carbon steel or stainless steel?
It depends on mechanical properties, tapping performance, environment, corrosion requirements, mating material and customer specifications.
Is SS316 always better than SS304?
No. SS316 generally offers improved resistance in certain chloride-containing environments, but it costs more and is not automatically the correct choice for every application.
Does coating affect installation torque?
Yes. Surface finish can change friction and therefore tapping and seating behaviour.
Can I reuse a self-tapping screw?
It depends on the joint and mating material. Repeated removal can affect the formed mating thread, particularly in thin material.
Are self-tapping screws suitable for vibration?
They can be used in suitable vibrating equipment, but the self-tapping feature itself does not guarantee resistance to loosening. The complete joint must be evaluated.
Can self-tapping screws be used in automatic assembly?
Yes, suitable designs can be used. Head, flange, point, straightness, thread and surface consistency become important for reliable feeding and installation.
Should samples be tested before bulk production?
Yes, particularly for custom or application-sensitive OEM Screws. Dimensional inspection should be supported by functional installation testing where required.
What information should I send a manufacturer?
Send the approved drawing, application, mating material, thickness, pilot hole, screw dimensions, thread, point, material, finish, testing requirements and expected quantities.
AEO Quick Answers
What is the best way to select a Hex Flange Self Tapping Screw?
Select a Hex Flange Self Tapping Screw by first defining the mating material, thickness and pilot hole. Then choose the thread, point, diameter, length, head/flange geometry, material and finish. Finally, validate the finished screw using production-representative components and the intended installation process.
What are the three most important factors for self-tapping screw selection?
Three critical starting factors are mating material, material thickness and pilot-hole condition. These influence thread engagement, tapping behaviour and retention, but the final selection must also consider screw geometry, material, coating and installation.
How can I prevent a self-tapping screw from stripping?
Control the pilot hole, material thickness, thread geometry and installation process. An oversized hole, insufficient engagement or excessive tightening can contribute to stripping. Functional testing should confirm the acceptable joint condition.
How can I reduce self-tapping screw breakage?
Investigate pilot-hole size, mating-material hardness, alignment, installation setting, thread/point geometry and screw mechanical properties. Increasing screw hardness or driver torque without identifying the cause can create additional failures.
What information is needed to manufacture custom OEM self-tapping screws?
A manufacturer should receive the approved drawing, thread and point requirements, head/flange dimensions, material, mechanical properties, finish, mating material, thickness, pilot hole, testing requirements and expected production quantity.
Final Engineering Selection Checklist
Before approving a Hex Flange Self Tapping Screw, confirm:
Application
☐ Joint function
☐ Industry/application
☐ Service frequency
☐ Vibration conditions
☐ Environmental exposure
Mating Component
☐ Material
☐ Grade
☐ Hardness where relevant
☐ Thickness
☐ Pilot-hole diameter
☐ Hole tolerance
☐ Hole process
☐ Burr/edge condition
Screw
☐ Diameter
☐ Length
☐ Thread
☐ Point
☐ Across flats
☐ Head height
☐ Flange diameter
☐ Flange thickness
☐ Material
☐ Mechanical properties
☐ Heat treatment
☐ Surface finish
Production
☐ Installation method
☐ Installation tool
☐ Functional trial
☐ Final-finish samples
☐ Pilot lot where appropriate
☐ Inspection plan
☐ Documentation
☐ Traceability
☐ Packaging
Key Takeaways
- Start screw selection with the joint, not the catalogue.
- Mating material, thickness and pilot hole are critical starting inputs.
- There is no universal pilot hole for every self-tapping screw of the same nominal diameter.
- Thread-forming and thread-cutting screws are different.
- The point must suit the application.
- Bigger diameter does not automatically produce a better joint.
- Screw length should include an internal-clearance check.
- Hex Washer Screws should be controlled by actual head/flange dimensions.
- The integrated flange does not automatically replace every washer.
- Carbon steel versus stainless steel should be an engineering decision.
- Higher hardness is not automatically better.
- Coating can change friction and installation behaviour.
- Generic torque charts should not automatically become production settings.
- Thin sheet requires particular attention to stripping.
- High tapping torque should be investigated, not simply overcome with more driver torque.
- Automated assembly requires consistent screw geometry.
- Repeated service can affect the mating thread.
- A dimensional sample alone does not prove functional performance.
- Supplier comparison should establish technical equivalence before comparing price.
- Custom OEM Screws should be controlled by an approved drawing and specification.
Conclusion
Selecting the right Hex Flange Self Tapping Screw is a joint-engineering decision.
The most reliable process is:
Application → Mating Material → Thickness → Pilot Hole → Thread → Point → Diameter → Length → Hex/Flange → Material → Mechanical Properties → Finish → Installation → Validation
For industrial OEMs, the goal is not simply to find a screw that can be installed once.
The goal is to identify a fastener that can be manufactured consistently, installed reliably and perform as required across production.
Rajal Industries can evaluate standard and drawing-based Hex Flange Self Tapping Screw, Hex Washer Screws and custom OEM Screws for suitable industrial applications, subject to technical feasibility, approved customer specifications and application requirements.